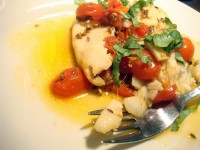
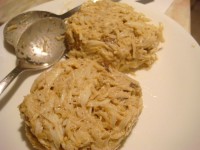
RERUN Episode 21: Indian-Spiced Fish Tagine and Sweet-Hot Carrots

This week, I make a fish tagine–essentially, fish cooked in a stewpot–with spices from a favorite Indian recipe. On the side: carrots with cinnamon, honey and red pepper…and some potatoes that take a damn long time to cook.

Continue reading

RERUN Episode 19: Crab Cakes with Tomatoes and Corn on the Cob

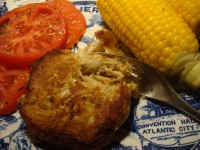
This week, I put together a very quick late-summer meal: Maryland-style crab cakes, sliced tomatoes and corn on the cob with butter. (Note: after this episode, the podcast will be on break until August 20.)

Continue reading

RERUN Episode 7: Pad Thai and Cucumber Salad

This week, I demonstrate the relative ease with which you can make this takeout staple for your own sweet self. Absolutely no wok required! The shopping list might look a little daunting, but all the odd stuff will keep in your pantry a very long time, so whenever you have a pad thai craving, you just have to pick up the few fresh ingredients. The cucumber salad on the side is cool and refreshing, and just generally good to know.

Continue reading

Episode 21: Indian-Spiced Fish Tagine and Sweet-Hot Carrots

This week, I make a fish tagine–essentially, fish cooked in a stewpot–with spices from a favorite Indian recipe. On the side: carrots with cinnamon, honey and red pepper…and some potatoes that take a damn long time to cook.

Shopping list

    • Fillet of white fish (tilapia, cod, etc)
    • Carrots
    • Grape tomatoes
    • Whole lemon
    • Cilantro (optional)
    • Garlic
    • Ginger
    • Fennel seeds
    • Coriander seeds
    • Cumin seeds
    • Whole cinnamon stick
    • Aleppo or other red pepper
    • Honey
    Rice, couscous, orzo, potatoes–your choice

Indian-Spiced Fish Tagine

tagine 015A tagine is a Moroccan cooking pot with a cone-shaped lid. The cone-shaped lid helps condense the steam created in cooking and keeps the food moist. But, happily, you don’t actually need a tagine to make this–any heavy cooking pot with a good lid will do. (Here’s an example–Cathy puts her pot in the oven, but you can just as easily keep it on the stovetop.) For more on tagines, see the note at the end of the recipe.

Tagine is also the word for the stew cooked in one of these cone-shaped pots. But the spice combo here is from a great Indian recipe for eggplant, so, really, if you don’t use a tagine to cook it, and it’s not a Moroccan spice mix…I guess you can’t exactly call it a tagine at all. But it’s delicious regardless, and the basic technique is a great one to know because it’s so versatile.

You can serve this fish with virtually any kind of starch. In the podcast, I boil some potatoes because I happen to have them, but couscous is of course good, as is rice or even orzo (rice-shaped) pasta. So as not to repeat my blunder in the podcast, you may want to start cooking whatever starch you prefer before you embark on the fish.

Serves 2 modest portions
1-inch chunk fresh ginger root
3 or 4 cloves garlic
2/3 pint (or so) grape tomatoes
Olive oil
About 1 tbsp whole fennel seeds
About 1/2 tbsp each whole cumin and whole coriander seeds
1 large filet tilapia or other mild white fish
1/2 tbsp butter
Salt
Zest from 1/2 lemon
Fresh cilantro, for garnish (optional)

Slice ginger into 1/4-inch-thick rounds–3 or 4 slices. Peel and roughly crush or chop garlic cloves. Slice tomatoes in half (use this technique).

Place your tagine (or heavy pot) over medium heat. Drizzle in a bit of olive oil, to coat the bottom of the pan. When oil is hot and shimmery, add the whole fennel, cumin and coriander and immediately stir to coat in oil. Continue stirring until they are fragrant, usually only a few seconds. If you’re afraid your spices might burn, feel free to yank the pan off the heat. Otherwise, quickly add the ginger and garlic–this will help lower the temperature of the oil–and turn down the heat to low. Stir the garlic to coat in oil, then add the tomatoes and stir everything to mix well, along with a big pinch of salt.

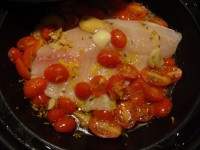
tagine 004Lay the fish fillet over the tomatoes, and scoop a bit of the oil and a few tomatoes over the fish–but make sure there’s a good cushion of tomatoes for the fish to rest on. You don’t want the fish to actually touch the bottom of the pan and cook via direct heat. Put the dab of butter on top of the fish, and grate the lemon zest over it.

Put the lid on the tagine and cook, on low heat, for about 10 minutes, or until the fish just flakes when you poke it with a fork. If the rest of your dinner isn’t quite done yet, just turn off the heat and keep the lid on.

Garnish with chopped fresh cilantro, if you like.

taginecreusetNote: I have a yuppified tagine, from Le Creuset (shown here). It’s a coated cast-iron base and a clay top. Because the base is so sturdy, I can put it directly on the flame on medium heat. But if you’re using a traditional tagine, with a clay base, you should prep all your ingredients in a separate skillet, which you can crank the heat on with no risk, and then transfer everything to the tagine, lay in the fish, and set it to cook on a low flame.

Sweet-Hot Carrots

tagine 005Carrots and cinnamon are a common Moroccan combination, and a dab of honey only enhances the sweet fragrance of the mix. But to balance out the sweetness, I always add a bit of hot pepper. These carrots cook up quickly in a covered pan on the stovetop–the tiny bit of liquid cooks away and leaves a nice glaze of spices and honey. I tend to think the butter adds a nice bit of richness, but it’s entirely optional.

Serves 2, with leftovers
3 large carrots
Olive oil
Dab butter (optional)
1 whole cinnamon stick
Squeeze of fresh lemon or (better) orange juice
Very small spoonful honey
Salt
Large pinch Aleppo pepper, or smaller pinch of cayenne or crushed red chile
Generous grind of black pepper

Peel carrots and slice into 1/4-inch rounds. Place heavy pan (it should have a lid) over medium-high heat. Drizzle oil in, just enough to coat the bottom, and add a dab of butter. When the oil is hot, add the whole cinnamon stick and stir, then add the carrots and stir to coat with oil. Squeeze in the citrus juice and add a pinch of salt.

Cover the pan and turn heat to low. Let simmer for 10-15 minutes, until carrots are tender and liquid has cooked away to leave a glaze. If the carrots are tender, but there’s still a bit of liquid, remove the lid and turn the heat up to medium to make the liquid boil away.

Near the end, add the red and black pepper and stir well. Remove the whole cinnamon stick before serving.

Episode 19: Crab Cakes with Tomatoes and Corn on the Cob

This week, I put together a very quick late-summer meal: Maryland-style crab cakes, sliced tomatoes and corn on the cob with butter. (For more on how I got this crab-cake recipe, visit my food blog.)

Shopping list

    • Lump crab meat, 1 cup or so (about 1/3 or 1/2 pound)
    • Egg
    • Mayonnaise
    • Dijon mustard

Old Bay

    • Bread crumbs or saltine crackers
    • Baking powder
    • Ripest, juiciest tomato you can find
    • Corn on the cob
    Butter

Baltimore-style Crab Cakes

crab-cakes-009First, a disclaimer: the ingredients here are all Maryland, but the actual shape of the crab cake is not. (I guess I instinctively replicate the salmon cakes my mom used to make for dinner.) For a more authentically Baltimorean look, see the note and the photo at the end of the recipe, provided by Peter.

Now let me just say: there is nothing better than a really simple crab cake with very good crab. So, while there are some varieties of canned crab that are passable, most of them are awful, and you should make an effort to get fresh (or at least pasteurized) crab meat–see the note at the end of the recipe for more details.

Serve with sliced ripe tomatoes, generously salted, and corn on the cob, boiled in salty water for just a couple of minutes. In the podcast, I drain the water off the corn, then toss a bit of butter into the pot with the hot corn and shake it around to coat everything–much easier than trying to smear butter on at the table. Be sure to drizzle any remaining butter-and-corn-water over the corn and tomatoes when you put it on your plates.

Serves 2 with summer (ie, somewhat light) appetites
1 egg
1 cup lump crab meat (about 1/3 pound; see note)
Large dollop mayonnaise (about 1 tbsp)
Small dollop Dijon mustard (about 1 tsp)
Old Bay, to taste
1/4 tsp baking powder
1-2 tbsp bread crumbs or crushed saltine crackers (see note)
1 tbsp butter

Whisk the egg up in a small bowl until the white and yolk are well blended. Place the crab meat in a larger bowl, then drizzle in about half of the whisked egg. Add the mayonnaise, mustard, Old Bay (start with about 1/2 teaspoon; add more if you like spicy, or if your Old Bay is showing its age) and baking powder and mix well. The mix will likely be beige-orange from the Old Bay, and fairly wet. Add the bread crumbs, starting with 1 tablespoon, and adding a bit more if the mix still looks like it won’t hold its shape when scooped with a spoon. (If you’re making the mix in advance, don’t add any extra crumbs–as the mix sits, the crumbs will absorb more of the moisture.)

crab-cakes-001Shape the mix into two crab cakes, as in the photo (or see the more traditional method in the notes below). Melt the butter in a heavy skillet over medium heat. When the butter is bubbling, slide the crab cakes into the skillet and turn the heat to medium-low. Place a lid over the skillet for about 2 minutes to cook through to the center of crab cake. When the bottom is nicely browned, after about 4 minutes, flip it and brown the other side. The crab cakes are done when they’re nicely browned and moist but not oozing liquid inside.

Notes:
Crab: If you live on the East Coast, you can probably get fresh, cooked lump crab meat from a good fish store. Backfin crab meat is good too–a little more shredded, and so a little cheaper, but also often tastier, and a fine texture for the crab cakes. Elsewhere in the country, whatever crab meat you get will be pasteurized, and not quite as tasty, but not bad. Marylanders of course use blue crab only, but king crab meat (from Alaska) is also delicious, though Dungeness crab doesn’t (in my mind) have quite the same sweetness. I did once use a passable brand of canned crab, but I have not been able to find it again–if I do, I’ll post the details here.

Bread crumbs: In the podcast, I use panko, or super-crispy Japanese-style bread crumbs. This is very handy to have around the house, and it lasts forever. Look for it at Asian stores. You can of course make your own bread crumbs, but avoid the supermarket-standard bread crumbs, especially any with any kind of seasoning, as they tend to glom together too much. It’s traditional in Maryland to use crushed-up saltine crackers, though I can’t say for certain whether they’re better or worse than the other options.

crab-cakes-012Shaping your crab cakes: Peter bit into these crab cakes and said, “I’m torn between saying how delicious they are and criticizing them.” He objects to the shape. It’s true, they ought to be more rounded, as in the photo–and it is quite nice to have some little shaggy bits of crab sticking out to get more browned than the rest. And Peter also prefers to broil his crab cakes, for about 4 minutes on a side directly under the broiler (use a heavy skillet, so they’re easy to rotate around under the heat if necessary). If you take the broiler approach, cut the butter into four pieces, then put a dab on top of each crab cake when you slide it under the broiler; then, when you flip them, add another dab. Really, a little butter makes all the difference.

Crab Cake on FoodistaCrab Cake

Episode 7: Pad Thai and Cucumber Salad

This week, I demonstrate the relative ease with which you can make this takeout staple for your own sweet self. Plus, absolutely no wok required! The shopping list might look a little daunting, but all the odd stuff will keep in your pantry a very long time, so whenever you have a pad thai craving, you just have to pick up the few fresh ingredients. The cucumber salad on the side is cool and refreshing, and just generally good to know.

Click to play this episode in a new window; right-click to download
Subscribe via iTunes
Subscribe via RSS

Shopping list

    Rice noodles (whatever size you prefer)
    Small shrimp
    Firm tofu
    Eggs
    Rice vinegar
    Fish sauce (aka nam pla or nuoc mam)
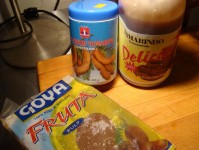
    Tamarind concentrate (see photo below for options: Goya or other tropical brand unsweetened frozen pack; Thai unsweetened, stocked with other sauces; Mexican sweetened, stocked with drink mixes)
    Sugar
    Cayenne Pepper
    Roasted, unsalted peanuts
    Peanut oil (or vegetable oil)
    Small dried shrimp (optional; see photo below)
    Preserved radish (optional; see photo below)
    Shallots
    Garlic
    Bean sprouts
    Scallions
    Cilantro
    Limes
    Cucumbers
    Jalapeno or other small fresh chile, red or green
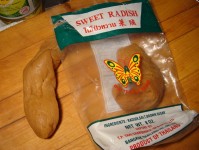
Preserved radish

Preserved radish (click to enlarge)

<i>Dried shrimp</i>

Dried shrimp (click to enlarge)

Varieties of tamarind concentrate: Goya frozen, Thai unsweetened, Mexican sweetened

Varieties of tamarind concentrate: Goya frozen, Thai unsweetened, Mexican sweetened (click to enlarge)

Pad Thai

pad-thai-016The various ingredients are all worth tracking down for the extra flavor and texture they add, but the most important element is the tamarind, which adds the crucial sourness. Before you start, make sure you have your counters cleared and a lot of little bowls at the ready–you’ll want to keep each prepped element separate. Also, you can prep the various items in any order–the order I do it in the podcast is random, just as things popped to mind. You may devise a smarter system.

For 2 dinner servings, and very generous lunch leftovers; could serve 3 hungry people for dinner, or even 4 not-so-hungry people

Set to soak in very hot tap water to cover:
8 oz. rice noodles

Peel the shells off:
5-6 oz. small shrimp (about 16)

Pat dry and chop into 1/2-inch-or-so cubes:
3-4 oz. firm tofu
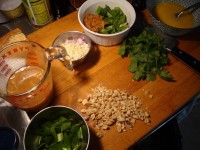
pad-thai-008Set in separate bowls:

    1-2 shallots, diced fine
    2 garlic cloves, minced fine
    2 eggs, lightly beaten
    2 tsp water
    Large pinch salt
    Green parts of 2-3 scallions, sliced in 1/2-inch pieces (on a diagonal looks prettiest)
    2-3 tbsp sweet preserved radish or turnip, in slivers (optional, but adds a nice chewy sweetness)
    1/4 cup rice vinegar
    1/4 cup fish sauce
    Generous 1/4 cup tamarind concentrate (see shopping list for specifics; if using sweetened Mexican variety, omit sugar below)
    Scant 1/4 cup sugar, or whatever to taste
    Large pinch cayenne pepper, or whatever to taste
    1-2 tbsp tiny dried shrimp, chopped coarsely (optional, but adds a nice extra layer of shrimpiness)
    Large glug peanut or vegetable oil
    *You may want to make a little extra of this sauce, in case your noodles get a little dry in the final cooking, or if you think you might be craving pad thai again within the week.

Garnishes, all in separate bowls:

    2-3 cups bean sprouts, rinsed (these can just stay in your salad spinner to drain)
    1/2 cup roasted, unsalted peanuts, coarsely chopped
    Green parts from 1-2 scallions, sliced in 1/2-inch pieces
    Leaves from half a bunch or so of cilantro
    2 limes, quartered
    *If you’ll be eating only part of the pad thai for dinner, and saving the rest, of course scale back the garnishes as necessary. If you have extras, store them separately from the pad thai so they stay fresh and crunchy.

When you’ve got everything prepped–or at least everything up to the garnishes–heat up a big cast-iron skillet on high. Add:
Big glug peanut oil (ideally; veg oil is fine too)

Toss in the tofu and fry, without stirring, until the tofu has a little crispiness on one side; stir to flip the cubes over and fry a bit longer. (This will take longer than you think, so you can use this time to prep the rest of your garnishes.) Then remove the tofu from the pan and set aside back in its bowl.

Add a little more oil to the pan if it’s looking dry, then toss in the shrimp and spread them out in a single layer. As soon as you can see pinkness creeping up the sides, flip them. By the time you’re done flipping them over, the first ones can come out–total cooking time is 1 minute, absolute max. Remove the shrimp from the pan and toss them in with the tofu.

Add a little more oil to the pan, then toss in the shallots and garlic. Fry until fragrant and just browning.
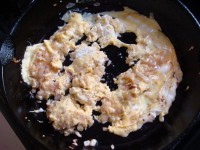
pad-thai-009Then add the eggs, and stir a little and fry until set (as in photo), then break into chunks with your spoon.

Drain the noodles, if you haven’t already, and add them to the pan and give them a quick stir. Then pour in the tamarind sauce mixture. There will be quite a lot of liquid. Turn the heat down to medium and let the noodles simmer for about 1 minute, just until the noodles have absorbed a lot, but not all, of the liquid–there should still be visible sauce in the bottom of the pan.

Toss in the scallions and the preserved radish. Stir to combine, and just let the scallions wilt (you might want to crank up the heat again very briefly). Finally, after about another 30 seconds, when the noodles are sticky but not dripping in sauce, turn off the heat, but leave the pan on the burner as you stir in the shrimp and tofu. (If in doubt, turn off the heat early–you don’t want your noodles to dry out and glom together.)

Let everything sit in the pan for a minute, for the flavors to meld, then serve up on plates, topped with bean sprouts, cilantro, peanuts, and fresh squeezes of lime.

Cucumber Salad
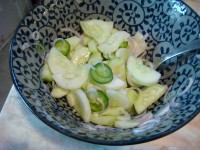
cucumber-saladThis cool, crunchy salad is a nice counterpoint to pad thai. It also goes well with just about any Asian-style stir fry. You can use any combination of shallot and/or scallion, or even red onion, and whatever kind of chili you have around. And, though, I don’t do it in the podcast because it would be too repetitious with the pad thai, you can also add cilantro.

Serves 2
2 small cucumbers, or most of a large one
1 large shallot, or the white parts of 2 scallions
1/2 jalapeno, or green or red bird’s-eye chili
3-4 tbsp rice vinegar
1-2 tsp water
1-2 tsp sugar
Pinch salt

Peel the cucumbers and slice lengthwise, then into half-rounds, as thin as you have patience for. Slice the shallot in thin half-rings, or the scallions in rings. Slice the jalapeno in rings, discarding the seeds if you like. Combine all this in a bowl, then add the vinegar, water, sugar and salt and stir to combine. Let sit about 20 minutes if you have the time.

Pad Thai on FoodistaPad Thai