Episode 16: Recipe Decoder: Butter

This week, I talk about that magical ingredient, butter–salted vs. unsalted, various types, when to use a lot, when to use a little….

Butter is one of those great ingredients that makes a lot of things taste sensational, but a lot of people are unreasonably afraid of it as well. Yes, restaurants are often guilty of applying it gratuitously, for a quick-and-easy taste sensation, but at home, you can use it judiciously, and you shouldn’t skip it just because it seems like it might be bad for you.

fatTo convince you that maybe butter won’t kill you, check out Jennifer McLagan’s excellent cookbook Fat: An Appreciation of a Misunderstood Ingredient. There’s a whole chapter devoted to butter. Granted, it’s titled “Butter: Worth It,” so, yes, it implies it might be a bit of a guilty pleasure. But it also has a sensible attitude toward the use of it. I of course don’t recommend cooking everything in this book at once, but you’ll learn a lot.

Episode 15: Spaghetti with Lemon and Basil, with Wilted Arugula with Pine Nuts

This week, I make an easy, summery pasta dish, plus arugula that’s a nice variation from the usual salad. It all comes together very quickly, and doesn’t heat up the kitchen much–great when the weather is hot.

Shopping list

    • 1 lemon
    • Bunch fresh basil
    • Bunch fresh arugula
    • Spaghetti (at least 1/2 lb.)
    • Pine nuts (about 1/4 cup)
    • Butter (about 4 tablespoons)
    • Parmesan cheese (a half-inch chunk)
    • Olive oil (a drizzle)
    • Fish sauce (a few drops)
    Red pepper flakes

Spaghetti with Lemon and Basil

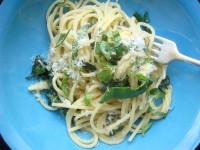
lemonspag-026I cook this all the time in the summer–there’s something about the flavor combination that’s so refreshing, and in the summer, I don’t really feel like I need a big meaty main dish. I learned the recipe from a surprisingly good free promotional cookbook I got from the Parmigiano-Reggiano people a good ten years ago, and to be fair, the quality of the grating cheese does make a difference. So use Parmigiano-Reggiano, ideally, or, in a budgetary pinch, Grana Padano, though you’re not using so much that genuine Parm will break the bank.

For 2 servings
1 lemon
Large handful fresh basil leaves
Half-inch chunk of Parmesan
3-4 tablespoons butter
1/2 pound spaghetti
Salt, to taste

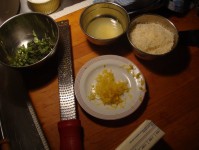
lemonspag-001Set a pot with heavily salted water on to boil. Then get all the pasta ingredients ready (as in the photo): grate the zest from the lemon into a small bowl, then squeeze the lemon juice into another small bowl–you’ll want about 1 tablespoon total, maybe a dash more. Rinse the basil well, then slice into thin strips. Grate the Parmesan cheese–you should have about 1/3 cup. Measure out your butter.

In a heavy skillet (the same one you will have prepared the arugula in is fine) on medium heat, melt the butter, then add the lemon zest and juice and let simmer for a minute or so. (You can do this part in advance and let it sit until the pasta is cooked.)

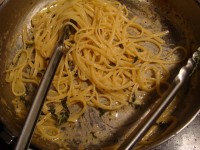
lemonspag-005Cook the pasta according to the package directions–usually 6-8 minutes. When it’s just al dente (err toward less done), set aside a bit of the pasta water in a mug, then drain the rest of the pasta. Toss it into the skillet with the butter (turn the heat back on to medium, if it has been sitting), and stir the pasta to coat evenly (tongs are good here). Gradually shake in all but about 1 tablespoon of the cheese, stirring the pasta constantly. If the mixture gets a bit dry or too sticky (as in the photo), add a tablespoon or two of the reserved pasta water. Finally, toss in the basil and turn off the heat. Taste for salt (you may not need any if you’ve salted your pasta water well, and used salted butter). Serve with the reserved cheese sprinkled on top.

Wilted Arugula with Pine Nuts

lemonspag-013This preparation takes a little of the intense peppery bite out of arugula, so give it a try even if you’re not ordinarily an arugula fan. And the basic technique–wilting greens with a little bit of liquid in a hot, covered pan–is one you can apply to all kinds of greens. Pine nuts add a little crunch and additional protein, to make the dish just a tad more substantial. Fish sauce is optional (a shortcut to melting anchovies in the hot olive oil before adding the greens), but it adds just a touch of extra richness. To save on cleanup, you can make it in the same pan you’ll later finish the pasta in.

For 2 servings
1 medium bunch fresh arugula
Olive oil
2 small handfuls pine nuts
Fish sauce (or salt)
Pinch red pepper flakes (Aleppo pepper is ideal; Italian pepper flakes will do too)

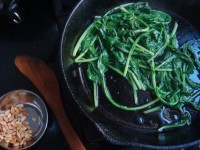
Rinse your arugula very well, but no need to dry. Set a heavy skillet over medium heat and drizzle in a glug of olive oil. When the pan is hot, toss in the pine nuts and stir occasionally till nicely browned, usually less than a minute. Remove the nuts and set aside.

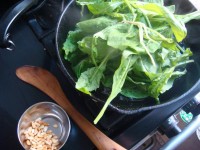
lemonspag-012Throw the wet arugula in the pan, and stand back a bit to avoid any spattering oil. (If you’re starting with dry greens, toss them in, then add a tablespoon or two of water.) They won’t look like it’s all going to fit (as in the photo), but as you stir quickly (tongs can be useful here) to coat the leaves with oil, they will start to wilt immediately. Then put the lid on the pan and turn the heat to medium-low. Cook, covered, for just 20-30 seconds, until the arugula is completely wilted, but still bright green.

Remove the greens from the pan immediately to stop the cooking, then drizzle on a few drops of fish sauce (if you have it) and stir. If you want to stay veggie, or you don’t have fish sauce, just sprinkle on a bit of salt. Top with red pepper flakes and serve. (This can sit and cool a little–it doesn’t need to be served piping hot.)

Episode 14: New Mexico Red Chile Sauce

This week, by special request from a fellow New Mexican, I cook up a batch of the distinctive red chile sauce used all over everything in New Mexico.

New Mexico Red Chile Sauce

redchile-016I usually eat this on scrambled or fried eggs, topped with some grated cheese and briefly melted under the broiler. You can of course use it for a batch of enchiladas (you might want to double the recipe), but I find I rarely get there before I eat it all up. It’s also good dropped in posole (hominy stew). It lasts for about a month in the refrigerator, in a tightly sealed jar, and it tastes better if you let it sit overnight and reheat.

As I say in the podcast, purists often don’t use any spices at all. If you do use them, go light–too much cumin or oregano can make the whole thing taste kind of muddy and cheap.

Makes about 2 1/4 cups
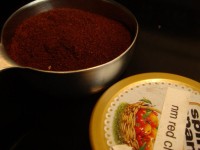
1/2 cup ground New Mexico red chile
scant 2 tbsp flour (about 2 heaping teaspoons)
1/4 tsp ground cumin (optional)
1/2 tsp ground coriander (optional)
2 tbsp lard or vegetable oil
2 cloves garlic
2 cups water or chicken stock
Pinch salt
Pinch dried oregano (optional)

Turn on your kitchen fan or open a window–the oils in the chile can make you cough.

Heat a heavy skillet over medium heat. Add the chile, flour, and, if using, cumin and coriander, and quickly stir to toast the spices, just until fragrant and the chile darkens slightly. Take the skillet off the heat if you’re worried the chile has gone too far, and continue to stir the dry mix until it cools a little.

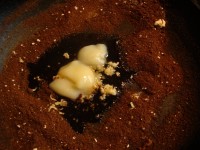
redchile-009Scrape the dry mix to the sides of the pan to leave an empty spot in the center. Squeeze the two garlic cloves through a press (or mince the garlic very finely beforehand) into the center of the pan, then add the vegetable oil or lard. Stir and fry the garlic until fragrant, then incorporate the dry spices into the oil to make a very thick, dry paste. Fry this a little bit more–maybe just 10 seconds or so, max.

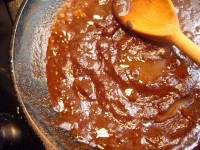
redchile-010Slowly add the water or chicken stock, stirring constantly and working out any lumps you see. The sauce will thicken almost instantly (as in the photo), but by the time you’ve added the full 2 cups of water, it will be quite thin again–this is fine. Add a pinch of salt, and some oregano if you like.

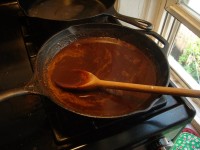
redchile-015Bring the sauce up to a boil, then immediately turn down to the lowest heat, so that it is just simmering. Let simmer for about 20 minutes or so, until it’s a bit thicker. Stir it occasionally to work in the skin that forms on the top (as in the photo). If it gets very thick, you can always thin it with a bit more water.

Store in a jar in the refrigerator. When reheating, you’ll probably need to add a bit of water to thin the sauce out again.

*Lard: Use good freshly rendered stuff (ask for manteca at your Mexican grocery), not the hydrogenated Armour blocks. If you can’t get the good stuff, use vegetable oil.

redchile-006*Chile: Purists usually start not with ground chile, but with whole New Mexican chile pods. And these might also be easier to find outside of New Mexico than the ground chile. Look in your Mexican grocery–they’re often sold alongside all the other varieties (ancho, mulato, etc.) and labeled “New Mexican.” If you’re starting with whole pods, pull of the stems, then crack them open and pull out all or most of the seeds, depending on how much heat you want. (Oh yeah–and one New Mexican cookbook I have advises you to wipe the dust off the chiles first–presumably if they’ve been hanging around on a ristra.) Lay the chile pods out on a cookie sheet and toast them in a 400-degree oven for about five minutes, until they darken and dry out a little bit. Then let them cool, and whiz them up in a spice grinder or a blender. (The cooling is important–hot chiles will release tons of oils into the air, which are painful to breathe.) Then proceed with this recipe, skipping the bit about toasting everything in a dry pan.

New Mexico Red Chile Sauce on FoodistaNew Mexico Red Chile Sauce

*Shameless self-promotion: I happen to write two guidebooks to New Mexico for the Moon Handbooks series. If you’re planning a trip to the state (and you should, to get more chile!), check them out here and here.

Episode 13: Sloppy Joes and Green Salad with Radishes, Avocado and Creamy Basil Dressing

This week, it’s that old-school standby, sloppy joes. On good crusty bread with an interesting side salad, it makes a very easy, very satisfying dinner.

Shopping list

    • Butter
    • Crusty sourdough bread
    • Ground beef (1 lb. for 4 people)
    • 1 medium onion
    • Ketchup (1/2 cup)
    • Red wine vinegar (about 1/2 cup)
    • Brown sugar (couple tablespoons)
    • Dry mustard, or regular dijon-style mustard (couple tablespoons)
    • Ground cloves or whole cloves
    • Celery seed
    • Lettuce
    • Radishes
    • Avocado
    • Basil
    • Yogurt, ideally thick Greek-style (about 1/4 cup)
    • Mayonnaise (big spoonful)
    • Miso OR anchovies
    • Lemon (one)
    Salt and pepper

Sloppy Joes

sloppyjoe-009Nothin’ fancy about these guys. But they are shockingly easy, they use almost no fresh ingredients (not a goal, obviously, but it’s good to have a few dishes like this in your repertoire) and, most important, they taste great.

For about 4 servings
1 medium yellow onion
1 tbsp butter
Salt
1 pound ground beef, not too lean
1/2 cup ketchup
1/4 cup red wine vinegar
2 tbsp brown sugar
2 tbsp dry mustard or prepared Dijon-style mustard
1/2 tsp celery seed
1/4 tsp ground clove, or 5 or 6 whole cloves
Salt and pepper

For serving:
Good crusty sourdough bread or rolls
Butter

Preheat your oven to 400 degrees. Set a heavy skillet on the stove on medium-high to preheat while you chop your onion into rough dice. Melt the butter in the hot pan, then add the onions and stir to coat well. Add a good pinch of salt. Turn the heat down to medium and let the onions soften up while you mix the ketchup, vinegar, sugar, mustard, celery seed and cloves together in a large measuring cup. Add another big pinch of salt and some grinds of black pepper if you like.

When the onions are translucent, or even a little brown, add the ground beef, breaking it into pieces with the edge of your spoon. You want the meat crumbled up fairly well, but a few larger pieces are OK for variety. Pour in the ketchup-etc. mix. Give your measuring cup a rinse with a couple tablespoons of water and pour that in too. Once the mix is bubbling, turn the heat down to medium-low and put a lid on the pan. Depending on your stove and what else you’re doing, you may want the heat on its very lowest setting.
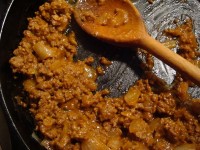
sloppyjoe-001Simmer about 20 minutes, until the flavors blend and there’s a nice sauce around the meat. (If you get distracted and the sauce cooks away, you can add a couple tablespoons more water and let it simmer again for another five minutes or so.)

About 10 minutes before the sloppy joes are done, stick your bread in the oven to heat up — if it’s fresh, splash it with a bit of water to make the crust extra-crispy.

Serve on hot buttered bread or rolls.

Green Salad with Radishes, Avocados and Creamy Basil Dressing
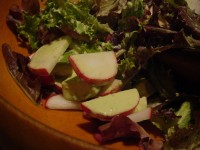
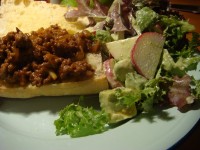
sloppyjoe-005Smooth, nutty avocados combine nicely with crispy, peppery radishes. I didn’t have them on hand for the podcast, but thinly slice red onions or chives would also be a good addition to this salad.

For the dressing, miso and anchovies serve the same purpose: an underlying saltiness and body. Use whatever you happen to have on hand, or invest in one or both. A tub of miso lasts for months, perhaps years, in the fridge, as do anchovies. You could also use other herbs–parsley, mint, tarragon–though probably in slightly smaller quantities.

For 2 generous servings
Half a head of lettuce
4 or 5 medium radishes
1 avocado

For the dressing:
2 heaping spoons thick Greek-style yogurt (or a bit more regular yogurt)
1 heaping spoon mayonnaise
1 large handful fresh basil
1 teaspoon miso, or 1 or 2 anchovy fillets, or a big squeeze of anchovy paste
Juice from half a lemon or lime
1-2 tsp apple cider vinegar
Salt, perhaps

Rinse your lettuce and arrange in a bowl. Chop up the radishes and avocados as you see fit. (Slicing rounds of radishes is extra-pretty, but difficult to keep stable on your cutting board–that’s why I usually do half-rounds, as the flat side makes them easier to slice.)

Combine all the ingredients except the salt in a blender and whiz to combine. Taste for salt–whether you want or need it depends on your miso or anchovies. If the mix is tarter than you want, add a dollop more mayonnaise and reblend. Pour the mix over your salad and serve.

Episode 12: Recipe Decoder: Zesting, Folding and Deglazing

This week, I talk about three very common terms that have a particular meaning in recipes, but–because they’re so common–are rarely thoroughly explained. Listen to hear what zest, fold and deglaze mean.

Just a quick summary: zest just means citrus peel (but listen to hear more tips on dealing with this, including the excellent Microplane); folding is a way of dealing with egg whites; and deglazing is essential for boosting the flavor of sauces, soups and stews–it’s a technique you may want to use even when recipes don’t mention it.

(If all the talk about browning in this episode has you puzzled, check out the earlier Recipe Decoder on browning, caramelizing and sauteing.)