Podcast: Play in new window | Download
This week: Just in time for (Greek) Easter, esteemed egg expert Peter (er, my husband) cooks the perfect hard-boiled egg in real time. Use this episode as your own egg timer at home!
Continue reading
Podcast: Play in new window | Download
This week: Just in time for (Greek) Easter, esteemed egg expert Peter (er, my husband) cooks the perfect hard-boiled egg in real time. Use this episode as your own egg timer at home!
Continue readingPodcast: Play in new window | Download
This week, I make a salad that is the perfect summer meal–easy to put together, little heat required, not heavy but still nourishing.
***PLEASE NOTE: Due to some tech problems, the egg boiling in this episode does not happen in real time–I had to cut out about three minutes. So set your own egg timer, and don’t rely on the recording. Sorry about this!***
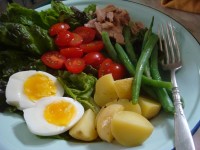
 This French composed salad makes a nourishing summer dinner. The basic ingredients are included here, and you can also add black olives, capers and/or fresh herbs (toss the herbs with the warm potatoes, or mix them into the salad dressing). Don’t skimp on quality tuna, however–you definitely want the kind packed in olive oil. For more on boiling eggs, see Episode 4, Perfect Hard-Boiled Eggs. For more on salad dressing, see Quick and Versatile Salad Dressing in Episode 2.
For one serving
1 egg
2 or 3 baby potatoes (Yukon Gold or Red Bliss)
3 or 4 large lettuce leaves
Handful grape tomatoes
Handful fresh green beans
Half small can tuna packed in olive oil
For the dressing:
2 tbsp olive oil
1 tbsp red-wine vinegar, or more to taste
1/2 tsp Dijon mustard
1 small clove garlic, crushed
Salt and pepper
Boil the egg according to the directions in Episode 4 (short version: boil 9 minutes). When done, run under cold water and set in a bowl with ice.
Wash your potatoes and cut them into quarters (or more, if they’re larger potatoes) and boil in heavily salted water for about 10 minutes, until a potato piece slides easily of a fork. When done, rinse in cold water then drain well.
Rinse lettuce and dry well.
Slice grape tomatoes in half (see note).
Wash and trim green beans, and boil briefly in salted water, until bright green but still crisp, about 1 minute. Drain and run under cold water.
Make salad dressing, following instructions in Episode 2 (short version: shake everything together in a tightly sealed jar). It’s a good idea to make more than the amount given here, so you have the extra for future salads later in the week.
Assemble salad: lay out lettuce leaves, then place additional ingredients, including the tuna, around the plate. Keep warm ingredients (egg, potatoes, beans) off the lettuce so the lettuce doesn’t wilt. Pour over dressing. You may also want to sprinkle a little salt on the tomatoes, eggs, potatoes and beans.
Note: If you’re making enough for two servings of salad, try using the nifty slicing trick I describe in the podcast, which I learned from Saveur magazine recently. Take two lids from plastic quart containers (often used for takeout food–at least here in New York). Place one on the cutting board with the rim sticking up, and arrange the tomatoes on the lid.
Then set the second lid on top, upside-down.
Hold the top lid in place and slide a serrated knife across to slice through all the tomatoes.
Podcast: Play in new window | Download
This week, I show you how to make a really good basic omelette. I’m doing it on video because it’s quick, and it’s the sort of thing you have to see to believe. It’s also an attempt to correct some very poor omelette-making advice by the Amateur Gourmet (more commentary on this on my blog). With this technique, you get a fluffy, tender omelette with perfectly melted cheese–and you don’t have to do any fiddly flipping. In a future episode, I’ll do an audio-only version, making an omelette as part of a full meal.
(Apologies…this takes a while to load. Watch on YouTube for faster service.)
One of the keys to a good omelette is the size of the pan, as you don’t want the eggs to be too deep or too thin in the pan. I usually make a two-egg omelette (three eggs is just too much of a project) and use a 6-inch skillet. For a three-egg omelette, I’d use an 8-inch skillet.
You also want to have your cheese and any other filling prepared beforehand, and you should grate your cheese as finely as you can. I use a Microplane zester.
Contrary to the advice of the Amateur Gourmet (or, to be fair, his chef mentor in the video), you don’t want to whisk your eggs a lot. The fluffiness of the omelette comes not from whipping air into them beforehand, but in how you treat them in the pan–you want to give them high heat to set the bottom up, but ultimately not let the eggs get too hot all the way through.
After that, you just have to watch the video to see… The real key to success is knowing it’s OK to turn off the heat while the eggs are still a bit runny. When you get the hang of it, you’ll have a very satisfying addition to your kitchen repertoire.
Podcast: Play in new window | Download
This week, I demonstrate the relative ease with which you can make this takeout staple for your own sweet self. Plus, absolutely no wok required! The shopping list might look a little daunting, but all the odd stuff will keep in your pantry a very long time, so whenever you have a pad thai craving, you just have to pick up the few fresh ingredients. The cucumber salad on the side is cool and refreshing, and just generally good to know.
Click to play this episode in a new window; right-click to download
Subscribe via iTunes
Subscribe via RSS

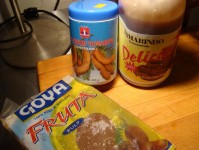
Varieties of tamarind concentrate: Goya frozen, Thai unsweetened, Mexican sweetened (click to enlarge)
 The various ingredients are all worth tracking down for the extra flavor and texture they add, but the most important element is the tamarind, which adds the crucial sourness. Before you start, make sure you have your counters cleared and a lot of little bowls at the ready–you’ll want to keep each prepped element separate. Also, you can prep the various items in any order–the order I do it in the podcast is random, just as things popped to mind. You may devise a smarter system.
For 2 dinner servings, and very generous lunch leftovers; could serve 3 hungry people for dinner, or even 4 not-so-hungry people
Set to soak in very hot tap water to cover:
8 oz. rice noodles
Peel the shells off:
5-6 oz. small shrimp (about 16)
Pat dry and chop into 1/2-inch-or-so cubes:
3-4 oz. firm tofu
Garnishes, all in separate bowls:
When you’ve got everything prepped–or at least everything up to the garnishes–heat up a big cast-iron skillet on high. Add:
Big glug peanut oil (ideally; veg oil is fine too)
Toss in the tofu and fry, without stirring, until the tofu has a little crispiness on one side; stir to flip the cubes over and fry a bit longer. (This will take longer than you think, so you can use this time to prep the rest of your garnishes.) Then remove the tofu from the pan and set aside back in its bowl.
Add a little more oil to the pan if it’s looking dry, then toss in the shrimp and spread them out in a single layer. As soon as you can see pinkness creeping up the sides, flip them. By the time you’re done flipping them over, the first ones can come out–total cooking time is 1 minute, absolute max. Remove the shrimp from the pan and toss them in with the tofu.
Add a little more oil to the pan, then toss in the shallots and garlic. Fry until fragrant and just browning.
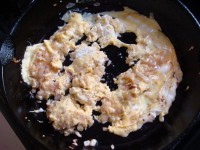
 Then add the eggs, and stir a little and fry until set (as in photo), then break into chunks with your spoon.
Drain the noodles, if you haven’t already, and add them to the pan and give them a quick stir. Then pour in the tamarind sauce mixture. There will be quite a lot of liquid. Turn the heat down to medium and let the noodles simmer for about 1 minute, just until the noodles have absorbed a lot, but not all, of the liquid–there should still be visible sauce in the bottom of the pan.
Toss in the scallions and the preserved radish. Stir to combine, and just let the scallions wilt (you might want to crank up the heat again very briefly). Finally, after about another 30 seconds, when the noodles are sticky but not dripping in sauce, turn off the heat, but leave the pan on the burner as you stir in the shrimp and tofu. (If in doubt, turn off the heat early–you don’t want your noodles to dry out and glom together.)
Let everything sit in the pan for a minute, for the flavors to meld, then serve up on plates, topped with bean sprouts, cilantro, peanuts, and fresh squeezes of lime.
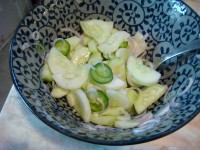
 This cool, crunchy salad is a nice counterpoint to pad thai. It also goes well with just about any Asian-style stir fry. You can use any combination of shallot and/or scallion, or even red onion, and whatever kind of chili you have around. And, though, I don’t do it in the podcast because it would be too repetitious with the pad thai, you can also add cilantro.
Serves 2
2 small cucumbers, or most of a large one
1 large shallot, or the white parts of 2 scallions
1/2 jalapeno, or green or red bird’s-eye chili
3-4 tbsp rice vinegar
1-2 tsp water
1-2 tsp sugar
Pinch salt
Peel the cucumbers and slice lengthwise, then into half-rounds, as thin as you have patience for. Slice the shallot in thin half-rings, or the scallions in rings. Slice the jalapeno in rings, discarding the seeds if you like. Combine all this in a bowl, then add the vinegar, water, sugar and salt and stir to combine. Let sit about 20 minutes if you have the time.
Podcast: Play in new window | Download
This week, I read through a recipe a friend brought me. She had eaten the dish and gotten the recipe, but it seemed very complicated. In this episode, I go through line by line to see where shortcuts can be taken, then compare it with another bread pudding recipe to show how the techniques differ–and which one is better for home cooks.
 The main recipe I’m looking at is Coconut Bread Pudding, by Laurent Tourondel. It was originally printed in the New York Times, and I’m reposting it here for the people who aren’t already registered at our fine newspaper of record’s website.
Continue reading
Podcast: Play in new window | Download
This week, I make a yummy early-spring dinner of Arroz con Pollo–saffron rice with chicken–with a crunchy fennel salad on the side. And there’s time for dessert–an eggy, fruity clafoutis with raspberries.
Podcast: Play in new window | Download
This week: Just in time for Easter, esteemed egg expert Peter (er, my husband) cooks the perfect hard-boiled egg in real time. Use this episode as your own egg timer at home!